Let's Build and Deploy a Static Blog with HTML, CSS, Bootstrap, and GitHub Pages

Vincent is a Cloud DevOps Engineer with years of hands-on experience supporting, automating, and optimizing mission-critical deployments in Azure and AWS, leveraging configuration management, CI/CD, and DevOps processes. Strong background in Technical Operations and customer relations.
Let's Build and Deploy a Static Blog with HTML and CSS

In today's tutorial, I will guide you on how to create a responsive static blog site with HTML, CSS, and Boostrap
Who's this tutorial for?
Anyone learning HTML, CSS, and Bootstrap
This tutorial is for beginners, learning HTML, CSS, and Bootstrap and trying to build simple stuff.
Prerequisite?
- A working system with access to the internet
- Any browser (I 💓 Brave, but chrome is popular)
- Any text editor (I 💓 VSCode)
- Basic knowledge of HTML, CSS, Git, and Bootstrap
- Git installed on your system
- A GitHub account
Time to Code
I love the terminal, so I will be using it a lot throughout this tutorial, feel free to use what works for you.
Open your terminal
If you're on the Linux system,
CTRL+ALT+Twill do the magic, or simply press thesuper button(Windows button, on PCs), and typeTerminal.If you're on Mac, the above command should work as well
For window users, simply press
WIN+R(windows buttonand the keyR) and typecmdand hit enter.
- Inside the terminal enter the following commands:
cd Desktop && mkdir static_blog && code static_blog
The above command will change directory to the Desktop, creates a directory called static_blog and open it in visual studio code 😉
Don't mind using the terminal?
If you don't mind, simply create a folder on your Desktop named static_blog, right-click it, and open with your favorite text editor.
Creating the necessary folders and files
Open your terminal (VScode inbuilt terminal) or any terminal pointing to the static_blog directory and enter the following commands:
touch index.html && mkdir public && mkdir public/img && mkdir public/css && touch public/css/style.css
This will create the basic folder and files we need
Or go ahead and create some folders and files using the structure below:
static_blog
- public
- css
- style.css
- img
- css
- index.html
Inside the image folder, I have included two images, one an image of me, and the other a sample image of someone writing.
Structuring your HTML
Inside your index.html type the following codes:
I advise you type this yourself, don't just copy and paste it. Typing the codes yourself helps you understand how it works. And also allows you to edit it and add your own personalized details.
<!DOCTYPE html>
<html lang="en">
  <head>
    <meta charset="UTF-8" />
    <meta name="viewport" content="width=device-width, initial-scale=1.0" />
    <title>My Blog</title>
    <link rel="stylesheet" href="public/css/style.css" />
    <link
      href="https://stackpath.bootstrapcdn.com/bootstrap/4.4.1/css/bootstrap.min.css"
      rel="stylesheet"
      integrity="sha384-Vkoo8x4CGsO3+Hhxv8T/Q5PaXtkKtu6ug5TOeNV6gBiFeWPGFN9MuhOf23Q9Ifjh"
      crossorigin="anonymous"
    />
    <link
      href="https://stackpath.bootstrapcdn.com/font-awesome/4.7.0/css/font-awesome.min.css"
      rel="stylesheet"
      integrity="sha384-wvfXpqpZZVQGK6TAh5PVlGOfQNHSoD2xbE+QkPxCAFlNEevoEH3Sl0sibVcOQVnN"
      crossorigin="anonymous"
    />
  </head>
  <body class="bg-theme container">
    <main class="main container">
      <!-- AUTHOR SECTION -->
      <section class="author text-center mb-5 mt-5">
        <img src="public/img/me.png" alt="Author image" class="author__img" />
        <h3 class="author__site_title mt-3">Vincent Iroleh</h3>
        <p class="author__intro mt-3">
          Hello! 👋 <br>
          I'm a Software Developer based in Aba, Nigeria <br>
          I'm passionate about making the web accessible to everyone.
        </p>
        <nav class="author__links nav justify-content-center">
          <a
            href="https://twitter.com/IrolehVincent"
            class="nav-link"
            target="_blank"
            ><i class="fa fa-twitter fa-2x"></i
          ></a>

          <a
            href="https://www.linkedin.com/in/irolehvincent"
            class="nav-link"
            target="_blank"
            ><i class="fa fa-linkedin fa-2x"></i
          ></a>

          <a
            href="https://github.com/vincentiroleh"
            class="nav-link"
            target="_blank"
            ><i class="fa fa-github fa-2x"></i
          ></a>
        </nav>
      </section>

      <!-- POSTS SECTION -->
      <section class="posts row">
        <article class="col-sm-6 mb-5">
          <a href="#" class="card-link text-secondary">
            <div class="card" id="card">
              <img
                class="card-img-top"
                src="public/img/blog.jpeg"
                alt="Card image cap"
              />
              <div class="card-body">
                <h5 class="card-title">Intro To HTML</h5>
                <p class="card-text">
                  With supporting text below as a natural lead-in to additional
                  content.
                </p>
                <small>Posted 2 May 2020</small>
              </div>
            </div>
          </a>
        </article>

        <article class="col-sm-6 mb-5">
          <a href="#" class="card-link text-secondary">
            <div class="card" id="card">
              <img
                class="card-img-top"
                src="public/img/blog.jpeg"
                alt="Card image cap"
              />
              <div class="card-body">
                <h5 class="card-title">Intro To CSS</h5>
                <p class="card-text">
                  With supporting text below as a natural lead-in to additional
                  content.
                </p>
                <small>Posted 2 May 2020</small>
              </div>
            </div>
          </a>
        </article>

        <article class="col-sm-6 mb-5">
          <a href="#" class="card-link text-secondary">
            <div class="card" id="card">
              <img
                class="card-img-top"
                src="public/img/blog.jpeg"
                alt="Card image cap"
              />
              <div class="card-body">
                <h5 class="card-title">Intro To Bootstrap</h5>
                <p class="card-text">
                  With supporting text below as a natural lead-in to additional
                  content.
                </p>
                <small>Posted 2 May 2020</small>
              </div>
            </div>
          </a>
        </article>

        <article class="col-sm-6 mb-5">
          <a href="#" class="card-link text-secondary">
            <div class="card" id="card">
              <img
                class="card-img-top"
                src="public/img/blog.jpeg"
                alt="Card image cap"
              />
              <div class="card-body">
                <h5 class="card-title">Intro To Github Pages</h5>
                <p class="card-text">
                  With supporting text below as a natural lead-in to additional
                  content.
                </p>
                <small>Posted 2 May 2020</small>
              </div>
            </div>
          </a>
        </article>
      </section>
    </main>

    <footer class="footer text-center mb-3">
      Copyright © 2020. Made with 💚 by
      <a href="http://twitter.com/IrolehVincent">@me</a>
    </footer>
  </body>
</html>
In the above code, we're using bootstrap 4 and font awesome (CDN) as you observe its linked in the head tag. You will need an internet connection for the CDN links to work.
Styling part of our HTML with CSS
Inside your style.css type the following codes:
I advise you type this yourself, don't just copy and paste it. Typing the codes yourself helps you understand how it works. And also allows you to edit it and add your own personalized details.
html {
  border: 5px solid green;
}

.bg-theme {
  background: #0d2538;
  color: #ffffff;
}

main {
  margin: auto;
  width: 50%;
  padding: 10px;
}

#card {
  background-color: #0f2d44;
  color: #ffffff;
}

article {
  transition: transform 0.2s; /* Animation */
}
article:hover {
  transform: scale(0.9);
}

.author__img {
  vertical-align: middle;
  width: 100px;
  height: auto;
  border-radius: 50%;
}

.author__img:hover {
  webkit-filter: grayscale(100%);
  filter: grayscale(100%);
}
My intention in this article is not to teach you HTML, CSS, or Bootstrap, but for you to create something with the knowledge you have already.
Deploying to Github - Github Pages
Github Pages allows you to host static websites directly from your GitHub repository. Just edit, push, and your changes are live.
Create a Repository
- Go to github.com and create a new repo called
static_blog - Go back to your code editor and execute the following commands to initialize git, add, commit changes, add remote origin, and push to the remote repo.
git initto initialize gitgit add .to add every changegit commit -m "first commit"to commit every changegit remote add origin https://github.com/vincentiroleh/static_blog.gitto establish a connection between the remote repo, replace therepo linkwith yoursgit push -u origin masterto push to the remote repo
Let's go Live
- After a successful push to GitHub, refresh your repo's tap and click on settings

- Scroll down to GitHub Pages
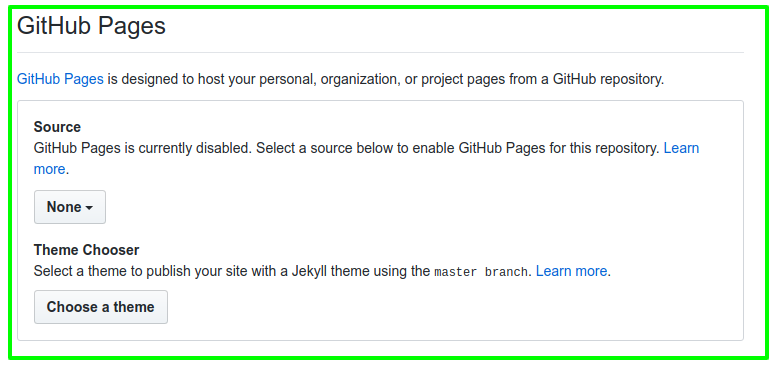
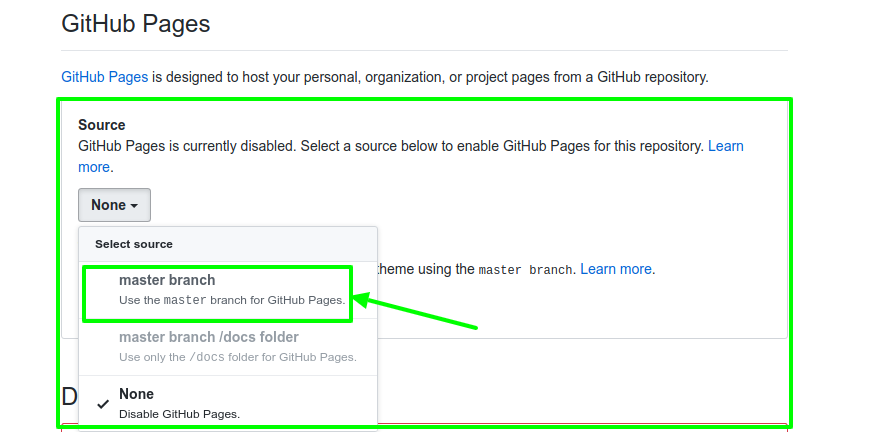
- Click on the
buttonunder source highlightednoneand selectmaster branch
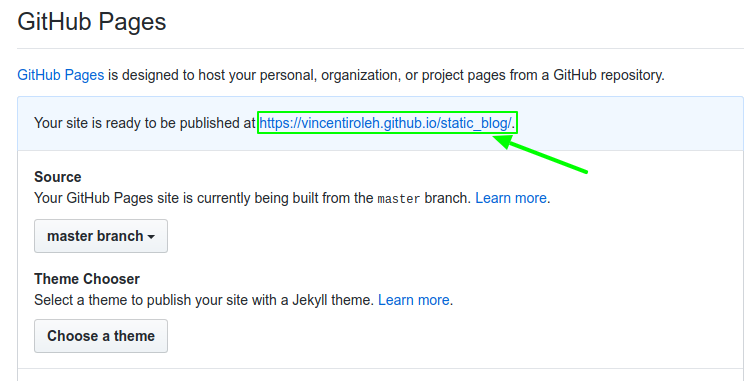
Bravo!!
Our page is now live, the page will refresh by itself, scroll down to GitHub Pages you will see the link to your page.
GitHub Repo
Feel free to compare what you have done with mine HERE
Bonus
Download a PDF version of this tutorial HERE